Archive for May, 2011
« Older Entries | Newer Entries »Billet Hubs
Wednesday, May 11th, 2011
Vdub Engineering has developed a billet hub for T1 front ends. The hubs are made from billet aluminum and are machined to exacting tolerances. The hub pictured on the right is intended for use with VW mk4 brake components (1.8T). The hubs use stock beetle bearings for easy installation.
Vdub Engineering can machine a hub to your custom specs, i.e. any disk and any bolt pattern with stock beetle bearings. The hubs can be machined with various front spacings, so you can decrease/increase your track without spacers. Imagine the possibilities:
– 944 brakes with 5-100mm on BJ car with no spindle modifications
-1.8T (5-100mm) brakes on LP T1’s with no spindle mods.
Any combo you can dream up, we can build. We can build hubs for any car out there, please inquire.
Custom hubs from $C550pr (please inquire), built to your specs.

Posted in Brake Parts & Kits | Comments Off on Billet Hubs
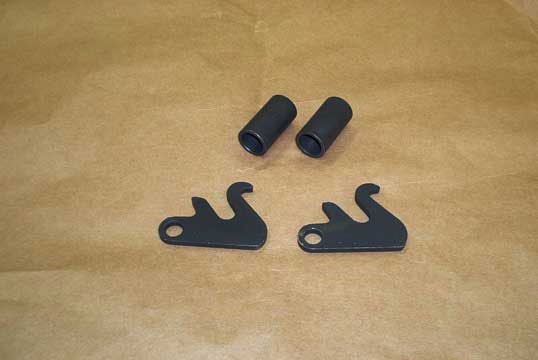
944 Ebrake adapters
Wednesday, May 11th, 2011
944 Rear emergency brake clip.
This kit included everything you need to adapt 944 emergency brake assembly to your stock beetle handbrake cable. They are compatible with either the 944NA or 944T brakes. The clips are CAD designed and laser cut for a perfect fit.
With these clips you will never have to fuss with custom made cables, or crimp-on cable ends that can break with use. By using stock beetle cables you insure a strong quality cable that is easily available.
Also included are extensions that marry the stock beetle handbrake cable end to the 944 tubular pieces. You will need to use the 944 steel tube (piece about 100mm long). See here for more details regarding 944 rear brake conversions.
The kit includes 2 ‘swan’ ebrake clips and 2 extensions, both finished in a durable black coating.
If you don’t have the stock 944 tube, order part VDE-010-036 which includes one piece aluminum tubes and swans for the early 944NA backingplate.
Kit’s for the 944 aluminum arms contain only the 2 swan clips. The stock beetle cable end can be slightly filed down to fit directly into the aluminum arm.

.Technical Specifications:
| Part Number | Application | What’s included? |
| Early_half | 83-85.5 944 removable backingplate | 2 swans and 2 extensions $C36 |
| Late | 86+ Aluminum 944 IRS arm | 2 swans $C30 |
| Early_full | 83-85.5 944 removable backingplate | One piece aluminum tube and 2 swans for beetle $C50
Bus $c55 |
s
Posted in Brake Parts & Kits, Uncategorized | Comments Off on 944 Ebrake adapters
Super and heavy duty tierods
Wednesday, May 11th, 2011
With performance brake and wheel options, stock tie-rods are prone to bending that can lead sloppy handling. Turning those big wheels and tires isn’t easy. The stock tie-rods were designed for 4″ wide wheels and 165 tires. Not too many of us still run that setup, so why run the stock tie-rods?
Super Duty tie rods are manufactured from DOM tubing and feature a 60% thicker tube wall when compared to stock tie-rods. Standard (Bug) tie-rod ends can be used, and lock nuts are supplied with the kit. Flats are machined into the outer end to allow for a 19mm wrench, which avoids the use of pliers on the outside of the tie rod shaft when locking the jam nuts. The super duty’s are designed for competition use. All T1 applications are priced at $C65/pair (with jam nuts).
Heavy Duty tie rods are also constructed from DOM tubing. This tie rod provides a 14% greater wall thickness over stock without being excessively heavy. Both ends are knurled for an easy grip when adjusting. Unlike the super duty’s, a flat is not machined in the end. Heavy duty tie-rods are perfect for a performance street car.
If your foot is excessively heavy or you are too enthusiastic in the corners, then VdubEngineering recommends the Super Duty’s. All T1 applications for $C55/pair with jam nuts. We can fulfill any size (ie narrowed beams etc.)
NOTE: Custom applications can be fulfilled; sandrails, T2’s, etc…please inquire.
Posted in Suspension/Engine | Comments Off on Super and heavy duty tierods
Super Beetle strut bar
Wednesday, May 11th, 2011
This is the easiest and cost effective way to improve the handling of your super beetle by tieing together the strut towers to eliminate flex and the dreaded camber changes that go with. Installation is easy and they come pre-assembled ready to go. Since not all cars are the same, this brace allows easy adjustment using left and right hand heim joint while installed. Constructed of a solid aluminum cross bar and steel plates, the design insures double shear loading on the heim joint as well as full trussing of the mounting plate to insure stiffness, yet non loaded sections are windowed to promote weight savings. All hardware is properly graded for the application and fully plated for long life and good looks. No alterations, or drilling is required for installation; this brace is bolt on and picks up on all three strut mounting studs. Will fit all years of super-beetles.


And with our left and right hand rod ends, the strut bar fits with no shimming. Installations takes less than 10 minutes.
Once installed you will notice a more positive steering feel and increased chassis stiffness. All this leads to greater driver confidence and pleasure.
Includes: 2 strut caps (LH and RH), Cross tube with rod ends and jam nuts.
Fits all 71-79 Super Beetles – $c150
Posted in Suspension/Engine | Comments Off on Super Beetle strut bar
Narrow beams
Wednesday, May 11th, 2011
Vdub Engineering manufactures these beams from all new material. The beams use strong one piece drawn over mandrel steel tubing, with steel uprights. The beams are fully jig welded on CNC machined fixtures to insure exacting tolerances. Why mess around with ‘cut and shut’ stock beams when you can have a brand new beam for a competitive price.
Beams are supplied with adjusters installed, and can be manufactured in any width you wish (wider or narrower than stock). Urethane bushings are installed for long life. The beam has proper body mounts and a steering stabilizer mount all threaded for stock VW metric bolts. A drill jig is included with each beam to allow you to drill and narrow your torsion springs with common hand tools. As an added bonus, the beam is about 25% lighter than stock.
Priced at $C300 ( no shock towers as pictured), or $c350 for shock
towers (upto 4″ narrow). Includes complete beam with adjusters and urethane bushings, finished in a durable wrinkle finish.
Currently available for Link Pin Type 1’s. Ball joint beams are in the works and you can pre-order for a 10% discount.
Vdub Engineering can also supply new heavy duty tie-rods to complement your beam at $C50/pr.
Posted in Uncategorized | Comments Off on Narrow beams
Boxster Brake brackets for MK4 golf
Wednesday, May 11th, 2011
These brackets adapts Porsche Boxster calipers (97-04) to MK4 front uprights. You have to use the 1st gen Audi TT rotors (312x25mm). Only works with 1.8T and VR6 cars, will NOT work with 2L or TDi cars. Includes all mounting hardware and banjo bolts to use the VW brake hose. Easy 30min install.
Posted in Uncategorized | Comments Off on Boxster Brake brackets for MK4 golf
Services:
Wednesday, May 11th, 2011
Cross Drilling rotors: We can custom cross drill your rotors to custom patterns. CAD designed for symmetry and balance. $c30/rotor
Bolt Pattern Machining: We can machine to almost any bolt pattern: 5-130, 5-114.3, 5-100, 5-112, 4-100 etc. Pricing on application (ex. Type 1 – 4 bolt disks/drums machined/studded for 5-130mm about $c170/set of 4 with studs. 4-100mm with studs $150)
Narrow beams: (Made new)
Type 1: Starting from $c300
Type 2: Starting from $c600
Narrow beams: (Modify existing, includes adjusters)
Type 1: $230
Pressing balljoints:
Type 1 $50/set
Type 2: $70/set
Link pin rebuilt (Type 1):
Labour only – take apart, clean, install and ream kingpin bushings, install link pin bushings, clean and paint $100
Link pin rebuilt (Type 2):
Labour only – take apart, clean, install and ream kingpin bushings, new seals, clean and paint $150. To lower 3.5″ add $60. Kingpin machining repair extra if required.
Posted in Services | Comments Off on Services:
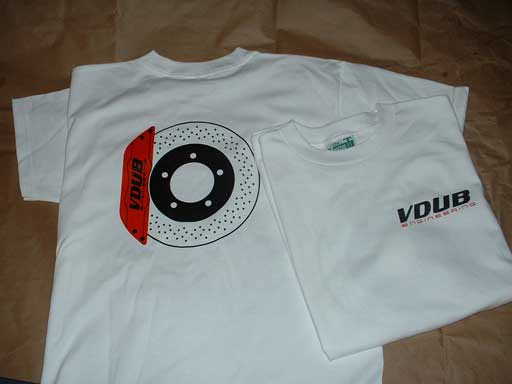
Vdub Gear
Wednesday, May 11th, 2011
Support VdubEngineering, pick up some of these fine threads!
White $C20 (M or L)
Grey $C18 (M or L)

Posted in vDub Gear | Comments Off on Vdub Gear
Custom Brake Details
Wednesday, May 11th, 2011
Custom Brakes – Guidelines
by Lanner Khan
With custom brake kits in Type 1’s (T1), it is important to take into consideration and understand all the factors.
Why brake upgrades?
In my opinion, there are three reasons; brake fade, changing wheel bolt pattern and bling factor.
Brake fade is when your brakes are getting too hot and the brake compound in the pads are gassing out and no longer effective. The temperature of the brakes is exceeding the thermal properties of the friction pad. Your rotors are not cooling because they don’t get a chance to dissipate the heat between brake applications. If your brakes fade, then you need more thermal mass via larger and thicker rotors. For performance applications, vented rotors are a must. Solid rotors are for motorbikes and go-carts in my opinion. If you currently have solid rotors and are experiencing brake fade, switch to a vented rotor. If your vented rotor fades, then you need to improve the cooling or increase the thickness of your disk. Brake fade can also occur from boiling the brake fluid. This condition is not typical of street vehicles. The caliper pistons need to be insulated to prevent this, via titanium pistions or ‘pucks’ inside the existing pistons.
With brakes from other vehicles, your choice of wheels increases dramatically. The 4-130mm bolt pattern isn’t very popular with aftermarket wheel manufacturers. And let us all agree, that the wheel offerings available for the 4-130mm wheel pattern are outdated.
Got 17’s on your car? Got stock drums? Hmm…not very sexy. Big brakes behind big wheels.
Brake Hydraulics
Basic hydraulic theory states that 1) liquids are incompressible and 2) the pressure of a given closed system is the same anywhere within the system.
Pressure[P] (psi) is force [F] (lbs) over area[A] (square inches). If a 1 inch diameter piston is depressed with a force of 150lbs, this will generate a pressure of (150/3.14*.5*.5) = 190.98 psi. If a hose is connected to another piston that has a 0.5″ diameter piston we will see some force multiplication. The force would be the pressure multiplied by the piston area. (190.98psi*.25*.25*3.14)=37.50 lbs. So we see that a smaller piston will generate a smaller force given the same pressure. To summarize for a closed system:
P1= P2 (pressure 1=pressure 2)
F1/A1=F2/A2 (same as above since P=F/A)
So far so good. According to the above, just increase the piston area and you can increase the piston force for the same pressure.
If only life were so simple.
Since hydraulic theory states that liquids are incompressible, the fluid must be displaced. A displaced volume [D] is equal to a movement [M] times ares [A]. So if the same 1 inch diameter piston is depressed by 1 inch, we will displace .785 inches cube of fluid (.5*.5*3.14*1). If a second piston of .5″ diameter was connected, we would see the second piston move by 3.998 inches (.785/(.25*.25*3.14)). So, bigger pistons require more volume. To summarize for a closed system:
D1=D2 (displaced liquid 1= displaced liquid 2)
M1A1=M2A2 (movement1*area1=movement2*area2).
Understanding brake torque
Brake torque is what stops the wheels. The brake torque (ft-lbs) of a wheel is the clamping force (lbs) of the caliper times the disk radius (ft), times the coefficient of friction for the brake pad. The disk radius is measured to the centre of the brake pad.
Clamping force (lbs) is the brake line pressure (psi) times the total piston area of the caliper (square inches). The total piston area of a fixed caliper is the total of all the pistons areas. In a sliding caliper, the total piston area is the total of all the pistons times 2.
The brake line pressure (psi) is calculated from the force applied at the pedal. The pedal force (lbs) is multiplied by the pedal ratio, and divided by the master cylinder piston area (square inches).
If you’re following the story so far you will notice that rotor thickness has nothing to do with brake torque. The rotor thickness is related to the thermal capacity. Also, note that the pad area does not play a part either. Increasing the line pressure is possible by either stepping on the brake pedal harder, or decreasing the master cylinder size.
The system in action
A master cylinder is depressed which pressurizes a fluid. This pressure is transferred to the caliper pistons which in turn push the brake pad onto the disk. Adequate volume is required to insure that the master cylinder does not bottom out before the caliper can generate sufficient brake torque to stop the vehicle. The actual movement of the piston in a caliper is about 0.010″-0.015″. When the force is removed, the square seal in the caliper retracts the piston to remove the clamping force from the rotor. The above two hydraulic laws are ideal. In practice other factors must be considered; swelling of brake hoses, caliper deflections, caliper mounting deflections, compression of fluid, air inclusions in fluid etc.
Brake Bias
Also, some consideration must be paid to brake bias, that is the front to rear braking distribution. Depending on the size of your front and rear caliper pistons, you may alter the existing brake bias of your master cylinder (MC). If you understand brake torque, you will notice that rotor diameter, friction material, caliper piston size all factor into the brake bias equation. Other factors include weight distrubution of the vehicle, center of gravity of the vehicle and tire size. Weight distrubution and center of gravity factor in the dynamic weight transfer during braking. Typical rear static brake bias is only about 20-35%. Remember regardless of all the brake factors, the final word is between the tires and the pavement. With that said, you can use these factors to fine tune your vehicle’s braking characteristics.
If needed, use a proportioning valve to tame your beast. A prop valve is basically just a hydraulic pressure regulator, except that it only kicks in at a certain pressure (knee point). Up to that point, the proportioning valve does not exist (hydraulically speaking). Prop valves only reduce existing pressure. You want to set up the brake system so that under panic braking all wheels lock up the same. Then bias is SLIGHTLY to the front so that the front brakes lock up a LITTLE sooner than the rear ones. (Easier and safer to remedy understeer then oversteer in panic situations).
Depending on your brake setup, it is possible that you will have to add a prop valve to the rear circuit if you have a brake system that is biased towards the rear (rear wheels lock up before front wheels in a panic situation). Prop valves only reduce existing pressure.
Prop valves can be found at any hot rod shop. Wilwood makes a nice little unit that you can purchase directly from them. You will also need some adaptor fittings to accept metric bubble flare lines for installation. Please check local laws regarding prop valves on front circuits.
Posted in Technical | Comments Off on Custom Brake Details
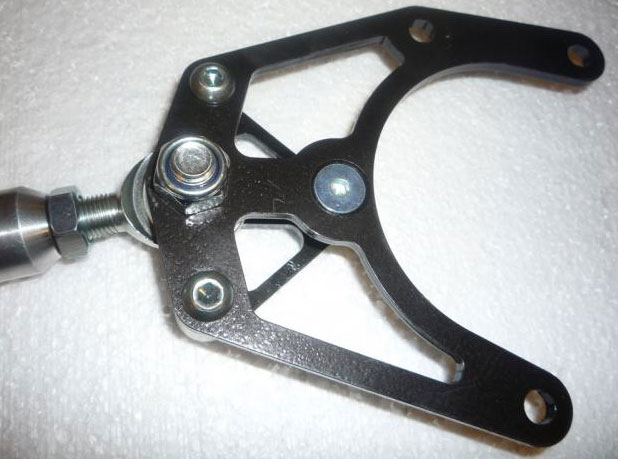
944NA to Dropped LinkPin Spindle
Wednesday, May 11th, 2011
Pictured is the kit for 944NA brakes (83-85) onto dropped link pin spindles. If the customer supplies the LP spindles and core 944 hubs, we can machine the hubs for the correct bearings, machine the spindle to suit, fabricate caliper brackets, provide all hardware and seals, install new bearings and include full instructions.
If you don’t have the 944 hubs and dropped spindles, these can be purchased for an additional fee (Please inquire).
$c540

Posted in Type 1/3 | Comments Off on 944NA to Dropped LinkPin Spindle
-
You are currently browsing the vDub Engineering blog archives for May, 2011.
Pages
Archives
Categories
- Best (1)
- New (6)
- Products (41)
- Brake Parent (32)
- Brake Parts & Kits (4)
- Porsche (4)
- Type 1/3 (13)
- Type 2 (11)
- Services (1)
- Suspension/Engine (6)
- vDub Gear (1)
- Brake Parent (32)
- Technical (5)
- Uncategorized (8)